These 8 x 10 framed pictures have such a great vintage appeal and would look perfect in the right kitchen! The frames are a vibrant green and have been antiqued and distressed to give them added character. $40 for the pair
")

31 Thursday May 2012
Posted in Relics Needing a Home
29 Tuesday May 2012

Bulletin board in burlap great for the kitchen, an office or a kid’s room! $15
Posted by revitalizedrelics | Filed under Relics Needing a Home
29 Tuesday May 2012
Posted in Recent Makeovers, Relics Needing a Home
Tags
This would be so perfect on a coffee table, end table or anywhere else you see fit! $12. Also, if you love it, but yellow isn’t your thing, please email me and for $3 more, I’ll repaint it!

23 Wednesday May 2012
Posted in Recent Makeovers
Yesterday was a very successful day at Goodwill! I love it when I leave with a full cart. It’s always hit or miss and yesterday was definitely a hit. I will be posting the transformations within the next week or so, as I get them done, but this is the first one and I’m excited about it.
I spotted this old calendar holder and as soon as I saw it, I knew exactly what I wanted to do with it. So, I quickly grabbed it and threw it in the cart!
")
First things first..let’s remove this raffia bow. Trash, please! Next, I removed the center board from the frame. Ok, time to sand and paint. I quickly sanded the frame and spray painted it white. Sorry, no picture of those two steps, but if you close your eyes and use your clever imaginations, I bet you can picture how it went down.
Well done…it’s white! See how easy that was, friends?
") OK, moving on… There is much to do, so I can’t sit around and watch the paint dry! Next, I needed to cover the board with cork, so that this calendar holder could become a cork board.
OK, moving on… There is much to do, so I can’t sit around and watch the paint dry! Next, I needed to cover the board with cork, so that this calendar holder could become a cork board.
")
I rolled out the cork and laid the board on top of it. I was prepared to use the razor blade, but the scissors worked just fine. I cut the cork to fit the board…easy enough.
") I used spray adhesive to attach the cork to the board by spraying one coat on the cork and one on the board. It attached very quickly. I tried to adjust it slightly and it ripped the cork! No big woop, though since I was going to cover it with burlap.
I used spray adhesive to attach the cork to the board by spraying one coat on the cork and one on the board. It attached very quickly. I tried to adjust it slightly and it ripped the cork! No big woop, though since I was going to cover it with burlap.
")
")
Time to cover this with burlap! I laid the cork board down on the burlap and cut enough to cover it and also to fold around the back. I attached the burlap to the board using the spray adhesive again.
")
") OK, let’s get back to the frame now. When I saw this calendar holder at Goodwill and had the vision of what it would become, I knew I wanted it to look very
OK, let’s get back to the frame now. When I saw this calendar holder at Goodwill and had the vision of what it would become, I knew I wanted it to look very shabby chic rustic. I applied Minwax dark walnut stain with a cloth and gave it a nice, heavy coat. Once it was dry, I busted out the power sander (Christmas gift this year from my hubs)! I love using that thing. I feel so empowered! I would have taken pics of all this action, but it was impossible with stain covered gloves and a power sander in my hands. Again, time to use your clever imaginations. I sanded it for awhile because I wanted it to look very old and as if most of the paint had been rubbed away.
Ok, it’s rustic. And, now the final step… I had to reattach the board to the frame. What did this require? A hammer and nails…duh. So, I nailed one nail in each corner until it was attached.
") And once that was done, what did we have? A new/old rustic cork board!
And once that was done, what did we have? A new/old rustic cork board!
")
")
18 Friday May 2012
Posted in Recent Makeovers
Tags
I recently saw this chevron cork board on Pinterest and knew I had to have one. I didn’t plan on paying for one, though. I knew I could attempt this project!
![]()
So, I headed on down to Walmart this morning, bought a pack of these cork board tiles and a roll of painter’s tape. And yes, that is my little reflection in the plastic! ")
I already had the acrylic paint and I had many different colors, but I decided to go with the Robin’s Egg Blue.
")
I started in the center and measured evenly with the tape as my guide, working my way towards the outside of the tiles. And then, I painted in between the lines. When I started this project tonight, the lights were on…normal, right? Well, then came the almighty hail storm, followed by a 2 hour power outage. But, I wasn’t going to let that keep me down!
")
Painting in the dark, which is much like Dancing in the Dark, but not as fun.
")
You can see the sad working conditions I was forced to deal with and when you see the end product, you will understand why it didn’t turn out just how I had imagined!
I let the paint dry, which didn’t take long at all because the cork sucks it up fast. Then, I peeled the tape off and had a completed tile. I repeated this process three more times and then put all the corkboards together. As you can see, there is one board that doesn’t add up. Darn it! Not too shabby for painting in the dark, though, right? Once I cover it up with all of my random clippings, nobody will ever notice!
")
17 Thursday May 2012
Posted in Delectable Bites, Recent Makeovers
Tags
chicken, gold paint, greek, recipe, sun
This month is a busy month for many of us. With the school year coming to an end, there are graduations, parties, cookouts and that means one thing…lots of family time. While some people may not look forward to “family time” or maybe they do, but they can only stand it in doses, I feel very fortunate to have grown up with a family who I not only love, but one I genuinely have fun being around.
I grew up in a large Italian family and we love to eat, drink and cook. One of the funniest things is that we are also not the most humble crowd when it comes to appreciating the delicious meals we have put together. I can’t tell you how many times I can recall listening to my uncles, aunts or mom going on and on about how wonderful the food was as we were eating it. What can we say? We know and appreciate a fine dining experience!
I live away from my family now and I really miss those moments. But, that’s what is so wonderful about food. It evokes memories and takes you back to those times. Whether it be a recipe that has been passed down or the smell of the food cooking that reminds you of being somewhere with the special people in your life, it’s always there for you when you miss those people and those times.
This Sunday brings the anniversary of losing my amazing mom. It has been 3 years and not a day goes by that I don’t miss her. She was a great cook and thankfully, I have years of memories of sitting in her kitchen talking to her while drinking a glass of wine (when I was of age, of course!) One of my favorite dishes she made was Greek Chicken. And yes, while we are Italian, we can certainly dabble in other cultures!
She is really on my mind today. I found an old piece of yard art that belonged to her in my basement. It used to hang on the fence in her back yard. It had seen better days, as you can see. And sorry, I forgot the picture until I had started to paint it. I always do that!
")
I could have painted it any color, but I chose gold. When I looked at it, I kept thinking Greek sun god and gold just seemed appropriate. He is much happier now and so am I. My mom would also like it. 🙂
")
So, what about the chicken? Well, since I had Greek on the brain (and my mom), I thought about her delicious Greek chicken dish. I want to share the recipe with you all. It won’t disappoint…I promise! Just ask my husband. I made it for him on our third date. I know, I know! I started cooking WAY too early in the courtship. Oh well!

Greek Chicken
Ingredients:
Directions:
Bread the chicken in Italian bread crumbs and fry in olive oil for about ten minutes or until the chicken almost fully cooked. Pour the chicken broth and white wine over the chicken and add the capers, olives and tomatoes and let simmer for ten minutes. Lastly, crumble the Feta cheese on top.
Thanks for reading! This post was good for the soul. Have a great day, y’all!
16 Wednesday May 2012
Posted in Recent Makeovers
This lovely antique gold sconce would fill a small empty wall perfectly. It lost its mate somewhere along the way, but I rescued this one and painted it antique gold because one sconce can always be used to fill a nook or corner.
")
$15 makes it yours!
16 Wednesday May 2012
Posted in Recent Makeovers
Ya know what I love most about life? My family and friends and great food…oh and wine. But, you know what I love after those things? A steal! I seriously experience a natural high when I find something cool and trendy and don’t have to pay the not so cool price for it.
Foo dogs are very hot in design right now and they really add such interest to a room, whether they are perched atop stacked books, holding books together as bookends or just thrown into the mix on a shelf or coffee table.
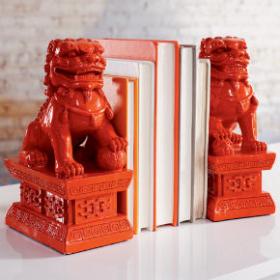
And today when I was in a discount home decor store, I spotted these puppies…foo puppies.

As you can see they are black…yuck. You can’t see the detail on them due to the dark color and really, how fun is black? Not so much. I debated as to whether or not I should get them and as I made my way out of the store, I snatched ’em up. As I was driving home, I couldn’t decide..glossy aqua or orange…hmm.
Well, I have painted one aqua and am digging it. I don’t know, though…the orange ones shown above are pretty cute, so I may paint this one over and do them in orange.
")
")

I will be selling them for $38 for the set, so if you are interested and want these puppies to be a specific color, email me at revitalizedrelics@gmail.com.
16 Wednesday May 2012
Posted in Relics Needing a Home
Tags

$10 for this fun one! SOLD!

$10 for this lovely aqua distressed wood candlestick SOLD!
16 Wednesday May 2012
Posted in Delectable Bites
Tags
Atlanta is FULL of amazing places to dine and that’s one of my favorite things about living here. One of my favorite restaurants is JCT Kitchen and their deviled eggs are by far the best I have ever tasted. So, when a blog I follow called The Trot Line posted the recipe back in April for Easter, I was super excited to try my hand at this deliciousness. I made them for Easter and I made them again last weekend for a party we hosted. Let’s just say, they were gone first from the table…even in the company of the brownies. I have to share this recipe because I know you will love it!

Ingredients 1. 10 large eggs 2. 1/4 cup plus 1 tablespoon mayonnaise (I will be using Duke’s) 3. 3 cornichons, minced 4. 2 tablespoons goat cheese, at room temperature 5. 2 teaspoons Dijon mustard 6. 1 1/2 teaspoons minced shallot 7. 2 teaspoons snipped chives 8. Kosher salt and freshly ground pepper 9. 1 ounce thinly sliced country ham or prosciutto, torn into 20 pieces
